#just playing around with 2160p. and new sharpen settings
Explore tagged Tumblr posts
Text


Henry Cavill as Geralt THE WITCHER (2019-) 1.01 The End's Beginning
#geralt of rivia#geraltedit#the witcher#thewitcheredit#witcheredit#witchersdaily#thewitcherdaily#henry cavill#henrycavilledit#tvedit#tvfilmgifs#adaptationsdaily#dailyflicks#fantasyedit#gifs by disdaidal#just playing around with 2160p. and new sharpen settings#think i'm slowly getting the hang of 4k... i still don't like it very much though lmao#i liked the colors in this scene a lot too so easy practice i guess
373 notes
·
View notes
Note
Hi! Do you mind sharing your coloring tutorial or tips? especially for the animation ones, they're so good! your gifs are crisp and HD
hi, anon. tysm! 🫶 i don't mind at all since i’ve gotten more than a few requests from before, ig it's time to give it a go. (more) details are under the cut. 😁

before we start, i want you to take note of the following things that will be helpful in the process of making/coloring gifs.
if you want to get the know-how on making gifs, @redbelles did us a solid and gave us this comprehensive guide that will save me the time for explaining lmao. 😅✌️
make gifsets without skipping frames. keep frame delay 0.05 and 0.06 for less than 25 frames. anything more or less is too fast or too slow. additionally, it's also important to note that if you're dealing w videos that are faster than 30fps you change the frame delay to 0.04.
gif using the the new dimensions (in this tutorial i used the dimensions of 540px x 510px since it's all about big gifs now 🙄).
use the standard sharpening settings (smart sharpen, amount 500%, radius 0.3px, remove gaussian blur and tick more accurate) also note the sharpening settings for 2d as you've specifically requested.
you can use action that will convert your gif back to frames and set your timing to 0.05 with a single click. basically photoshop will follow out all of these time-consuming steps for you! just download the action and double click it. it should now be added to your list of actions. to see your actions, go to window > actions. find the folder that says "GIF ACTION" and select the lines that says "CLICK HERE" and voila! ps will do all the hard work for you.
the coloring on your gifs will look good if you have a good base so try not to skip on video qualities. use high quality copies like 1080p or 2160p (4k ones are good) the higher the gb the better. it makes coloring so much easier and reduces grains.
*cracks knuckles* let's start!
for 2d animation's sharpening settings, it usually varies so i just move the amount around and see what looks or works better for a specific gif. i used amount: 189 and radius: 0.2 for this ponyo gif. anything can work between 189 to 350 for me but i maintain the radius at 0.2. again, you can just play the amount around until you find the one that looks good for your gif.

when i’m making gifs. i look for that notorious contrast between the light and dark parts. i think it gives life to the gif- so exposure, levels and curves are best to achieve that. for curves, just go to layer > new adjustment layer > curves. this layer is going to help brighten up the gif in certain areas, and darken others. select the white eyedropper. click the lighter part of the gif like the white/light part of the ship.
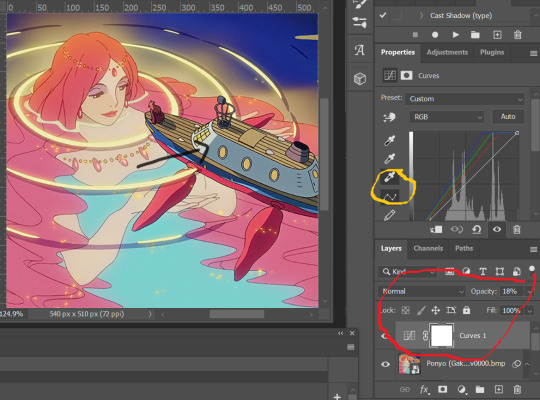
next, select the black eyedropper and click on a black/dark area of the gif (refer to the arrow bc i don't know which part of the ship is that called lmao).
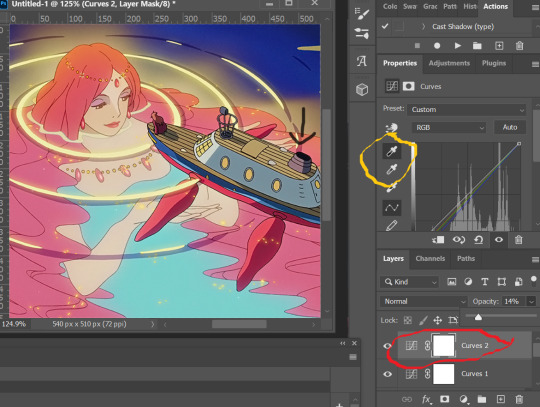
you can skip the black eyedropper if you're already satisfied w the result of the white one.
color balance and selective color are your two best buddies. they’re great when you’re trying to change some tones or specific colors of the gif, like the skin tone which is very tricky.
using selective color is pretty simple, here’s a really useful guide:
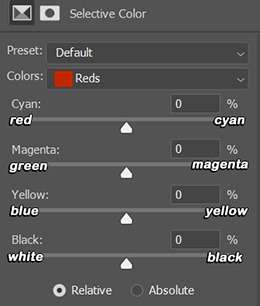
if you pull any of the tabs to the right, it increases the amount of color (cyan, magenta, yellow and black), and reduces the amount of opposite color (red, green, blue and white).
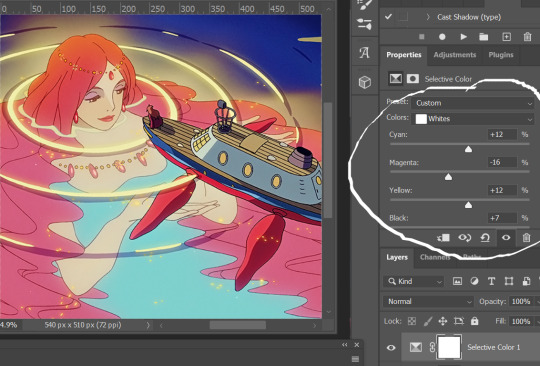

i also use the blacks and whites in selective color especially if the gif is saturated w colors to tone down some parts and make shadows more visible (idk if this is still making sense 😅).

in working with color balance, i use midtones and highlights sparingly. it's really helpful in removing or balancing out a certain tone.

here's my save setting ⬆️
idk why but ps puts the default frame delay to 0.07/0.03 so open your gif in ps again and don't forget to change the delay to 0.05.
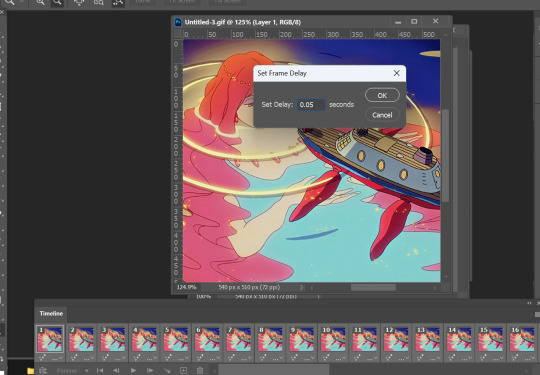
and we're done!

i sometimes go back and forth and do some tweaking until i’m satisfied with the result. this is how i color and i know it’s not perfect but i learn by constant practice. there’s really no standard in coloring so you can make yours the way you like it. just enjoy- until you get the hang of it and it becomes less daunting (or something like that). i hope this helps. if you have more questions, my askbox is always open 😊.
#completeresources#usergif#userpayton#usersugar#rresources#yeahps#itsphotoshop#userbells#dailyanimatedgifs#usercharl#usersavana#Chaoticresources#hisources#ps help#tutorials#ask replies#anon
183 notes
·
View notes
Text
making gifs - where to start
first up - source material and software downloads:
I recently got new versions of the twilight saga movies from Pahe, I went for the Bluray 2160p or 1080p whenever I could.
Use KMPlayer 64x to play and cap the movies.
You can get software like Photoshop from the various guides and websites suggested in this beautiful subreddit. This website is probably most user friendly.
1. how to make gifs?
This video tutorial is your most basic, bare-bone starting point. Grab a video you like, download KM player and get started.
2. adding a coloring
A coloring is what you add to your gifs to either color-correct them and make them look normal (looking at you - twilight blue tint) or to change the color palette for personal taste/visual effects.
Colorings usually come in the form of PSDs, as a pack of adjustment layers that has been saved in .psd format and uploaded for other people to download and use. Seldom, they come in the form of ACTIONs, as pre-recorded steps which will replicate on your project once you open the action in your Photoshop and activate it by hitting the "play" button.
Basic gif and coloring skills are all you need for your first gifs.
3. sharpening
Once you know your way around photoshop you can try your hand at sharpening. This is a tutorial on how to sharpen all layers at once "by hand". And some more advanced sharpening methods.
Nowadays, most people just record their usual sharpening steps and save them as actions. Or they use other people's actions. Here is a tutorial on how to use a sharpening action you've downloaded.
Here are a few more sharpening action sets you can use: x - x
4. adding text to gifs
This is my giffing arch nemesis so I'll just drop this tutorial here with zero explanation, y'all enjoy.
5. having fun with colors
This isn't something I do often so again, I'm just dropping this tutorial here with no explanation. But tldr gradient fill in combination with the right layer blending mode is your best friend whenever you want to add gradients, colors, colorful text, color changing text, aka all the fun stuff.
6. having fun with shapes
Now this is my bestie because where I struggle with colors and text I find messing with shapes comparatively easy. You can come across "gif templates" on tumblr fairly easily or make up your own shapes if you feel like it. Just make sure to keep it at a width of 540px total (each space between each gif should be 4px) and a height of I believe 750px total (but don't quote me on that last number).
This is a basic tutorial on how to plop two gifs into one canvas. The most important thing here is that you make sure that the number of frames or the lenght of the smart object is the same. Other than that you can go wild with this.
7. gif saving settings
@anue here on tumblr had THE BEST explanation for the different gif saving settings but went private and I'll legit never stop mourning that 💔
here are some other tutorials that attempt to explain the saving settings: one - two - three - four
most people roll with these settings but you're always welcome to adjust them for different gif sets and source videos. not every source video will like the same save settings (anime vs. disney vs. marvel action movie vs. snail documentary).
#tumblr#gif#gifs#gif tutorial#gif tutorials#*#I hope whoever comes across this finds it useful#tutorial
41 notes
·
View notes
Photo
Hello! As requested, here is a tutorial on how I make my gifs. I would like to preface this by saying there are many ways to make gifs, and there’s no right or wrong answer imo. This is just how I personally go about doing so!
I will be using PS CC 2017, but as long as you have the video timeline option, it shouldn’t matter too much; on any version of PS, you should be able to adapt anything I mention here! You will also need some kind of screen recording software. I’ll talk a little more about that under the cut.
To start, you need the source material you will be making the gifs from! I get mine from snahp(.)it (avoiding links so tumblr hopefully doesn’t banish this from the tags lmao) and I always opt for either 1080p or 2160p. Not all laptops will support 2160p as it’s 4K, but either works great! You just want your gifs to be the best quality possible.
Next is where the screen recording comes in. I don’t use the screencapping method to make my gifs (where you use a program to cap a clip and then load those caps into a stack in PS). This isn’t for any particular reason… it’s just how my friends, (who very kindly taught me to gif), had always done it, so it’s now how I do it too. Personally, I find the quality to be just as good as the screencapping method, and have never noticed a difference between the two.
As I have a PC, I use the software built into it for screen-recording. If you go here: theverge(.)com/2020/4/21/21222533/record-screen-pc-windows-laptop-xbox-game-bar-how-to – you can see how to use the XBOX screenrecorder to record from files you have d*wnloaded. This also works on some streaming sites, but I think it depends on what browser you use. Personally, I recommend Firefox, as that seems to bypass a lot of the blocking and ads that occur when trying to do this sort of thing.
For MAC users, I have been told handbrake works well, as it converts MKV files to MP4, which can then be used to make gifs. You only need to convert part of the file to MP4 depending on how much you want to gif, and this also bypasses the screenrecording stage, as you can edit MP4 clips on Quicktime. I am told you can split them into smaller clips by going to edit > trim and it saves the new clip!
I have also used anyvideoconverter for small clips, but I can’t say what it does to the quality of your video, or how big of a file it lets you put in! With the XBOX screenrecorder, it doesn’t matter what type of video files you get, as the recording will save to MP4 anyway.
LOADING YOUR FRAMES
Now, go ahead and record whatever clips you want to gif. Make sure you have the video timeline open, by going to window > timeline. Then, go to file > import > video frames to layers.
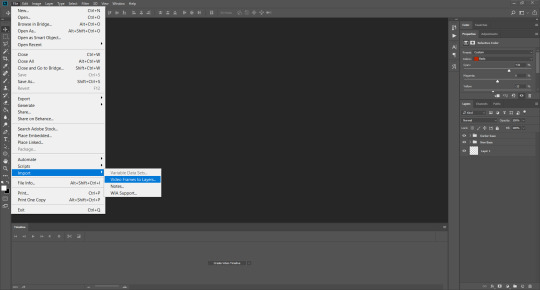
Next, select and open your clip from where it has saved (with the XBOX recorder, it saves in video > captures). You should see a little window pop up, where you can move the sliders back and forth to clip your recording to whichever part(s) you specifically want to gif. I recommend trying not to load a lot of frames into photoshop at once, but I would be a hypocrite to say that, since I do it a lot lmao. Just be patient if you do!
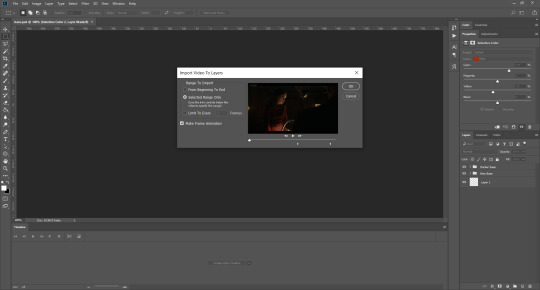
Once you have chosen the length, click okay. Never, EVER, I repeat NEVER click the button that says “limit to every __ frames”. This really ruins the flow and quality of your gif—it’s better to have shorter, but smoother gifs, I promise. And with tumblr’s new 10 MB limit, it shouldn’t be a problem anyway!
Then, your frames should open up. What we want to do is make them into a smart object, so we can edit all the layers at the same time. To do this, click the small button in the left-hand corner. ALWAYS click this first. If you don’t, it will only convert the first frame to a smart object and the gif won’t work.

Give it a second to sort itself out, then, on the right-hand side, select all your frames at once using the shift key.
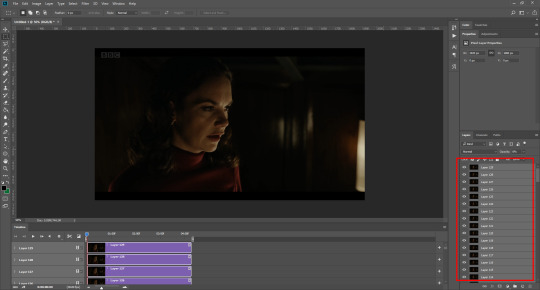
Then, go to filter > convert for smart filters. This might take a minute. Don’t click anything else in case PS gets angry lmao, just leave it for a second and it’ll do its thing. The more frames you have, the longer it takes! Now we have our gif, but it needs to be cropped, sharpened and coloured!
CROPPING
You want to start by selecting the rectangular marquee tool on the left-hand side, then drag it across by clicking and highlighting the area you would like to crop your gif to, like so:
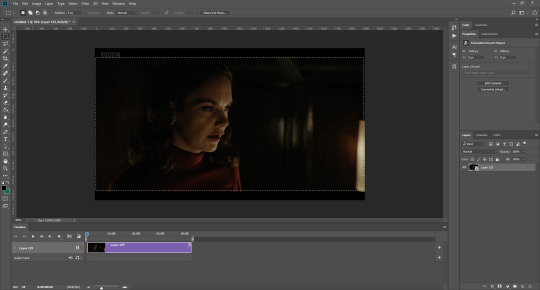
What I tend to do is select everything inside the black lines you sometimes get around your gif (this depends on what file you d*wnload), and also the tiniest bit inside the sides. This is because I’ve found if you crop it right up to the edge, you get a tiny bit of transparency on the sides of your gifs, which I’d rather avoid.
Once you have your desired selection, go to image > crop. Now, the dimensions for tumblr are 540px width, so all your gifs have to be that width. However, the length is up to you. I really like big gifs, so sometimes I even make a full square, or even longer. It’s entirely up to you, and what kind of set you want to make.
For the purposes of this gif, I will stick to what I usually go for, 540px by 350 px. This will mean you’ll have to crop some width off, but that’s okay, since Marisa isn’t central anyway. The cropping is always trial and error for me, as sometimes people move out of the frame within in the gif. The best thing to do is just try it, and then move the slider in the timeline window at the bottom to see if the person stays inside the gif, and if not, adjust accordingly.
Next, go to image > image size:
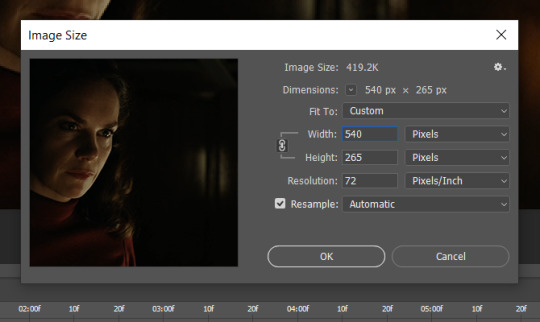
In this box, if I put the width as 540, the gif is a smaller height than I want, as it keeps to the dimensions of the gif when you load it into PS. That’s okay, just put the height you want instead, and we’ll crop off the excess.
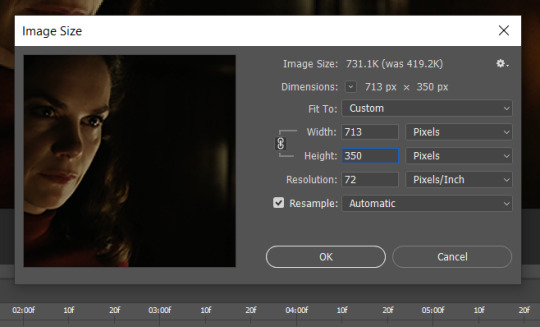
Then click OK. Using the rectangular marquee tool again, we need to remove the excess width. Part of the reason I like this version of PS is that it tells you the width of your selection as you do it, but you can always use the ruler as a guide, and check the size of your image by going to image > image size again.
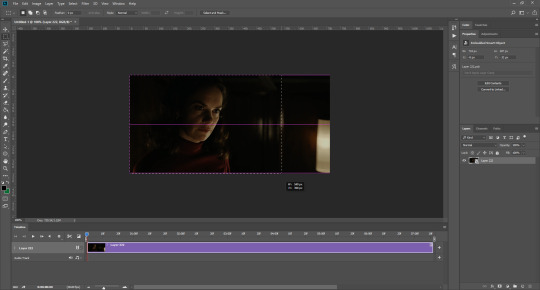

Again, use image > crop, and your gif should now be the correct size!
You can also use the crop tool in the timeline window to crop the length of your gif:
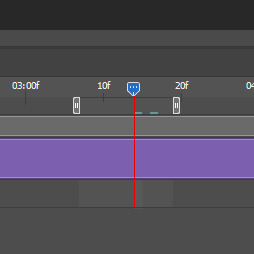
However, I tend to wait until later on to do this (which will be explained further down!)
SHARPENING
Next you want to go to filter > sharpen > smart sharpen.
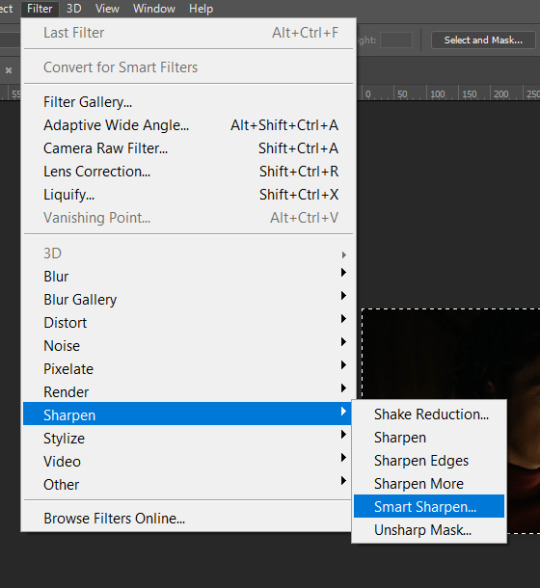
These are my settings. However, 0.4px is very sharp, too much so, but that’s easily fixed.
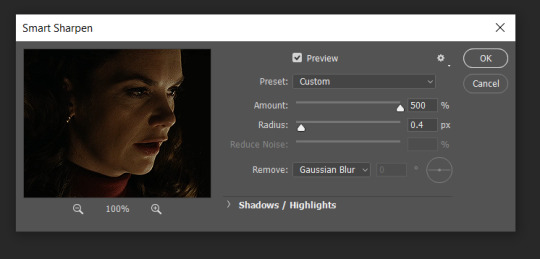
Go to filter > blur > Gaussian blur and then set it to 1.0.
Now on the right-hand side, we need to reduce the blur, so double click the little adjustment button, and change the opacity of the blur. I usually go for 20-30%!

Then click OK, and that’s your sharpening done!
COLOURING
I picked this scene on purpose as it’s dark, so good for showing how to colour a gif. I have a base psd which consists of some very basic adjustments, but it mostly exists so I don’t forget what adjustment layers I like to use. I adjust them every time I make a gif, essentially colouring each gif from scratch.
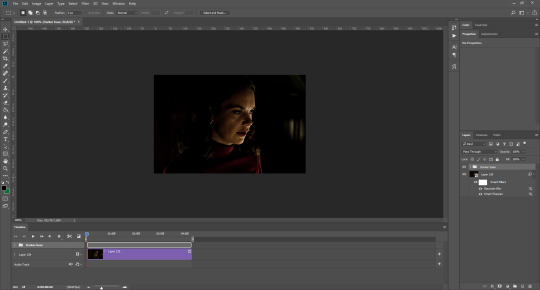
In this case, the psd actually makes it darker. So, what I will do is turn each layer off, and adjust as I go. A lot of people say using lots of adjustment layers ruins the quality of your gif… I have never found this to be true, as long as you are gentle with them. If you whack the brightness right up to the top, it’s going to ruin your gif no matter if you use 1 adjustment layer or 100. I would just say use your common sense, and adjust a little at a time!
I start with a simple black to white gradient map set to soft light, because I think it helps you see depth once you add some brightness to it. I usually do this on about 10%, or more if needed. It’s probably unnecessary, I just like how it looks!
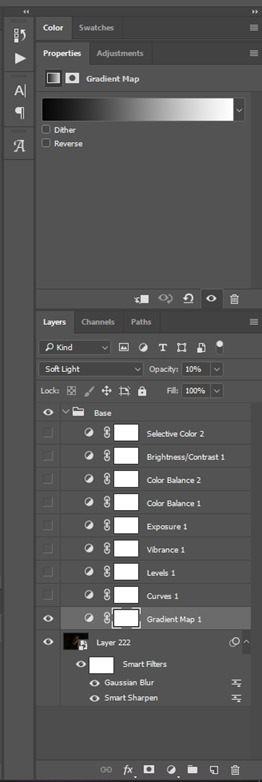
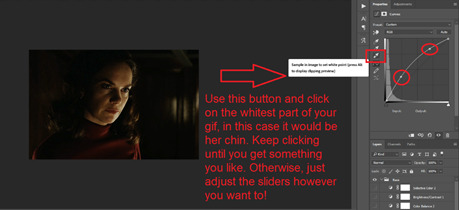
Then, I move onto using curves and levels. This is where things can diverge depending on who you’re colouring. If this person is white, it doesn’t matter too much. If they’re not white, you don’t want to white wash them. My best advice is to play around with it. By adding vibrance and other (usually the red) selective colour settings later, you can ensure you don’t change the person’s skin tone from what it originally was. You can also use layer masks at varying opacities (various shades of grey), on your curves and levels, to remove some brightening so that you’re not changing anyone’s skin colour. Just brighten slowly and check in with yourself honestly about how your gif looks.
Some people don’t like using levels, or curves. It’s completely up to you. I tend to use both because levels are good for bringing depth, even if not brightening (though I like to use them for that as well).
One thing you can do is use the white point of the gif to make PS adjust the curves itself, however I like to drag the sliders myself and see what it looks like. Just make sure it’s not too bright, as we will be using further layers to brighten more, after.
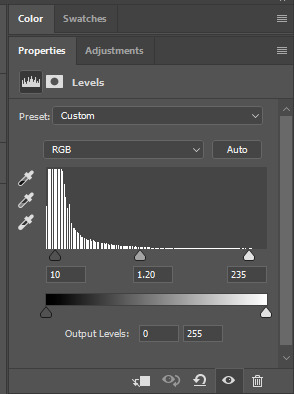
Next is levels. The slider on the left controls the black point, the one in the middle controls the midtones, and the one on the right controls the white points. The black brings depth, the midtones adjust the overall brightness, and the white points produce stronger highlights. Again, you’ll get a feel for how this works as you practice. Just don’t use the white point excessively, especially if your characters are not white.
Then I add vibrance (+20!), because we’ve removed a lot of it when lightening the gif. Next is exposure, which I find brings out the highlight and shadow areas more effectively:

Then colour balance! This helps with scenes that might be a certain colour, i.e. too blue, too green, too red, etc. Moving the sliders in the opposite direction of the colour your gif is will counteract it. The best thing to do when accounting for different colours, is to make a new layer every time you change colour, so that you don’t get confused. I always add a new layer for colour balance and selective colour if I want to change more than one thing. So one for red, one for yellow, one for pink, etc.
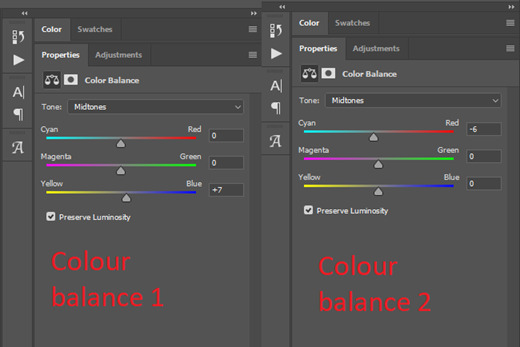
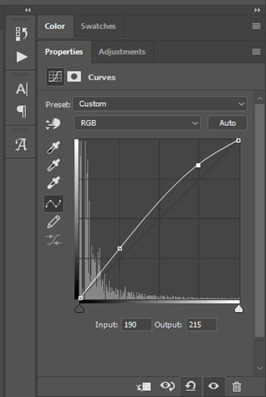
A layer of brightness just to make the gif pop, and because the scene is extra dark, I added a very gentle extra curves layer:
SAVING YOUR GIF
Time to save the gif. You can go ahead and file > export > save for web (legacy) now, but then you’ll have to reopen the gif to reset the frame rate from 0.07, to 0.05. Instead of doing that, I use a modified action. The original was made by the very talented @elenafisher! So I do not take credit for that at all. You can find the original here: elenafisher(.)tumblr(.)com/post/190817437374/gif-sharpening-action-2-preview-download and in my resources tag. Please reblog it if you’re going to use this!
To use an action, first make sure you have actions turned on in window > actions. To load in your action, go to the little lines circled, and then load the action from your downloads:
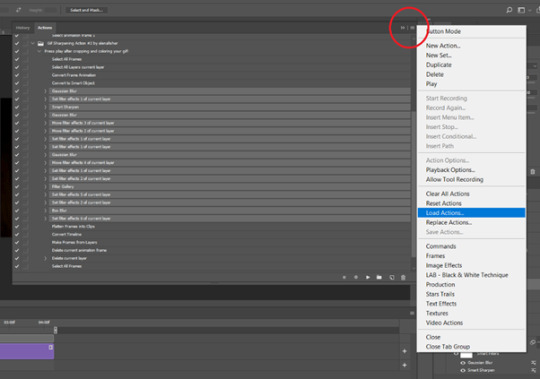
Obviously if you don’t want to sharpen your gifs yourself, you can use the action as it is, and it will give you a beautiful glowing effect. If you’d just like to use it to flatten your gif into frames like I do, make sure to take out all the items I have highlighted:
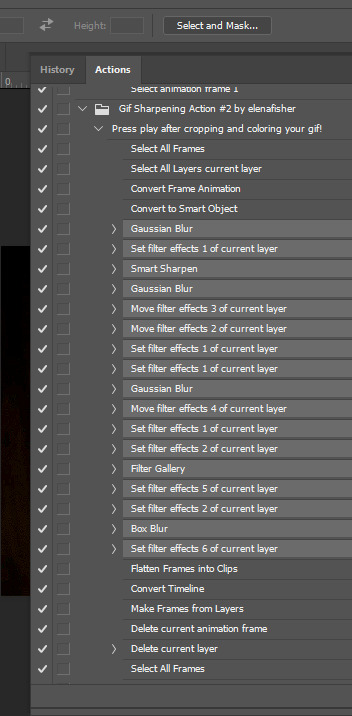
Until it looks like this!
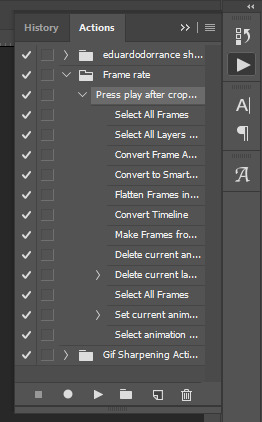
Make sure you have the layer under the file name highlighted, and then click the play button at the bottom! (If you get a screen saying select all frames cannot be found, don’t worry, just click continue!) You can delete the layer that does that if you want, I just keep it in case I realise I’ve forgotten to do something, because you can click cancel and edit your gif before you flatten it. Of course you can undo the steps to get back to the smart object version of your gif, it just takes longer!
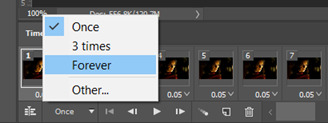
And now your gif is in frames and set to 0.05 already, so you don’t have to change the speed! All you need to do now before saving is change the gif cycle to “forever” in the bottom left-hand corner:
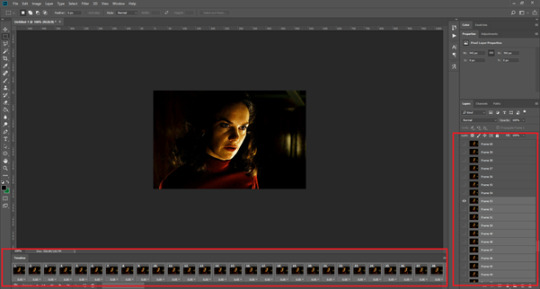
Then to save the gif go to file > export > save for web (legacy). Sometimes, the gif is bigger than the tumblr 10MB limit. You’ll be able to see this in the bottom left-hand corner of the gif save settings. If this is the case, I like to preview the gif, to see whether it would be best to cut frames off of the beginning or the end, or both. When you’ve decided, you can select the frames at the bottom, and in the right-hand side panel, and delete them both using the little bins/trash icons.
I keep checking and deleting frames until I get the gif under 10 MB! Just don’t delete frames from the middle, as then you’ll have the same issue as if you selected “every other frame” when making the gif: it won’t flow!
Lastly, these are my save settings:
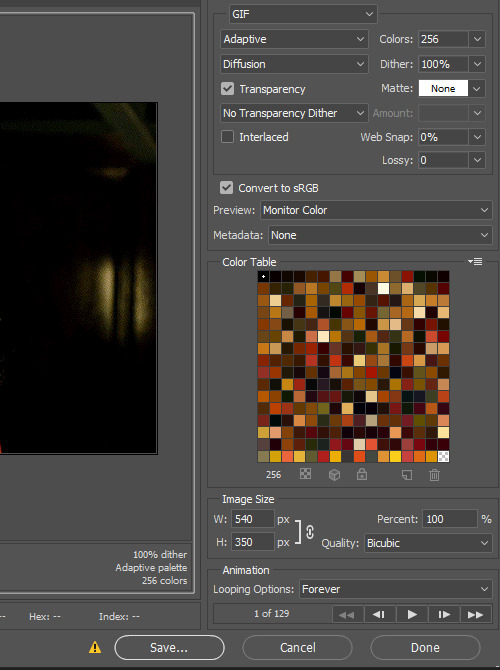
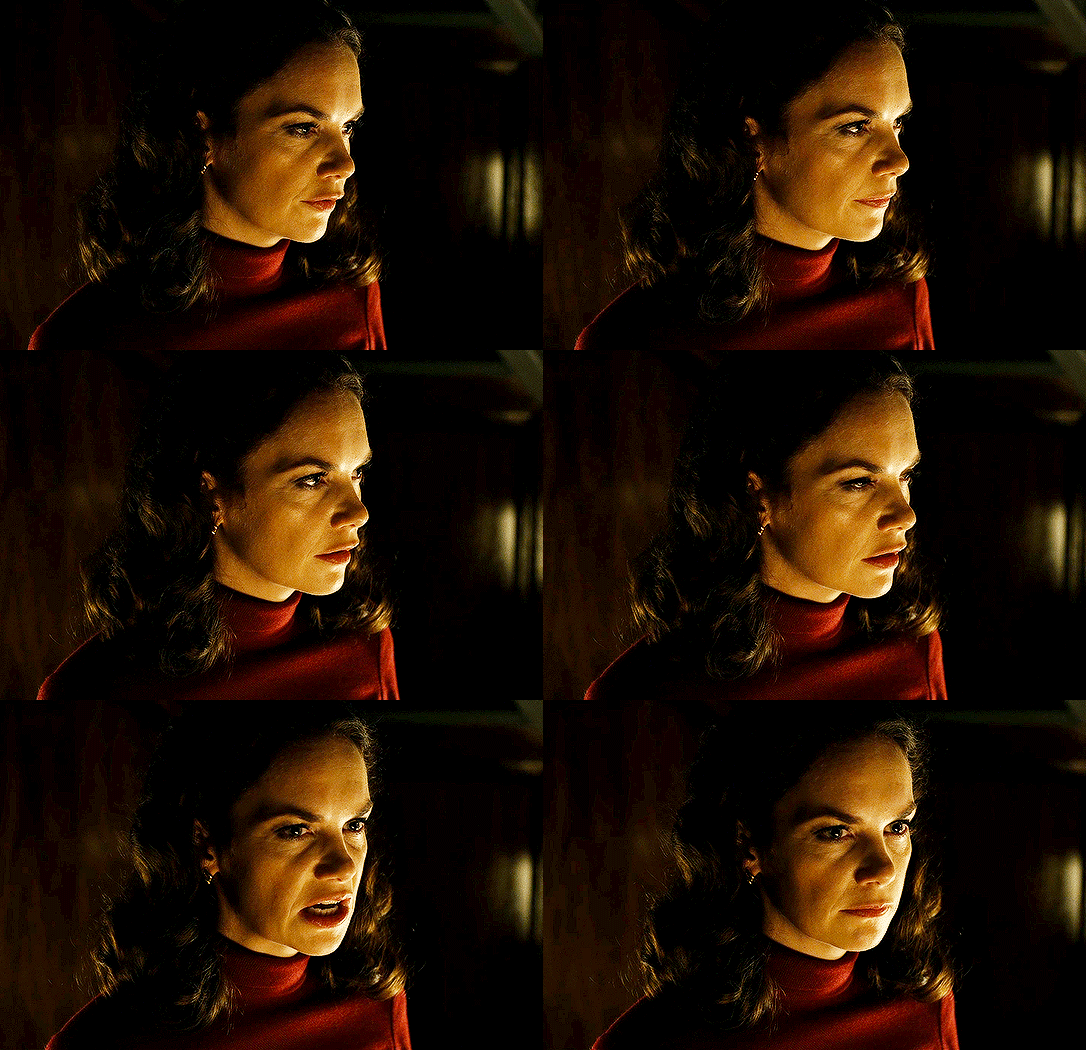
So that’s it! That’s how I make all my gifs. Blending I do when the gifs are in the grouped, smart filter stage, whereas text I add on during the framing section above! Really hope this is helpful, please feel free to ask any questions you may have! 💖
#gif tutorial#tutorial*#completeresources#yeahps#chaoticresources#allresources#mikesmom#usergeo#userava#usertix#usersmile#usertom#if you'd like me to cover anything more advanced just shout#i wanted to show how i add text too but tumblr wouldn't let me add any more pics#but people can let me know if that's something you'd want!
516 notes
·
View notes
Note
can I ask you for advice? how do you make colorful hotd gifs without them being so pixelated? I tried but it just looked way too grainy. I'm wondering whether it's the place I downloaded the episodes from (it's 1080p still)? can I ask you where you download the episodes from and how you sharpen/color your gifs please 🥺
Eyo! I try to work with as high quality as I can possibly get my hands on. For the hot d gifs, I use 2160p footage. I get most of my stuff off tor, if you want direct links IM me or send an ask off anon so I can get back to you with those.
These are my Smart Sharpen settings:
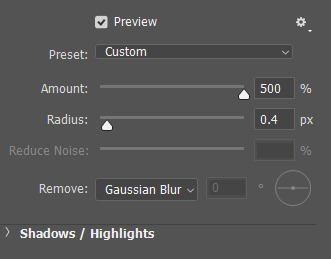
Pretty standard, most gifmakers use this. Back in the day I would just roll with only this because I kinda enjoyed the crispy vibe (I've been swimming in the gifmaking waters for over a decade oofe). But these days, I think since the dimensions and the quality are much higher, just slapping a sharpen on makes everything look noisy and grainy, so I usually duplicate the gif frames and apply an additional Gaussian Blur layer (that I then change the opacity of to 60-80% depending on the scene):

I work with smart objects + timeline animation nowadays so these apply to those. Back in the day I'd write scripts to apply actions to all my frame layers, but we don't do that anymore.
As for coloring, I tend to just color the scenes from scratch, starting off with Curves and Channel Mixer and then building on that. I might make a video on my process sometime or do a lil stream or something (if anyone would be interested anyway).
I tend to be not that great with written tutorials anyway (e.g. this very ask lmao), but there are some fantastic guides out there that can give you a general idea on where to begin. Like this one from Becca, or this one from Jagoda, or this one from Ava. I usually don't follow tutorials step-by-step, but rather see how other people work to pick up new things to try or optimize my own processes.
And as a final note, keep in mind that a lot of the top-notch beautiful gifsets that people on here make are the result of a ton of trial-and-error. So, just play around, have fun and let yourself fuck up a couple of times. You'll get there!
#asks#ps asks#myres#userbecca#ughmerlin#userava#i hope you don't mind i referred to you by your names btw#but uh yeah#hope this helps in some way#but tbf it would be easier to address your issue if i could look at the gifs you're making!
5 notes
·
View notes
Text
a gif tutorial! uwu
hello miss tumblr user kimnatozaki here! :) this will be an in-depth post of how i make my gifs.. i’ll try my best to explain the whole process but if things are still unclear, please feel free to dm me and i’ll be more than happy to help^^
before you start
the programs i use to make gifs:
• ps cs6 • avisynth - i followed this tutorial on how to install and use it but i’ll give an explanation of how i personally use it • topaz clean and topaz denoise - downloaded from here • kmplayer - when dealing with .ts files avisynth gives an error.. so instead i use this, record the scene i want to gif and then i use avisynth on that.. for any other video file i just use avisynth on it right away)
1. getting the video
when it comes to downloading videos, make sure to get the highest quality as possible! i personally would not go anything below 720p and i usually end up choosing 1080p even if 1440p and 2160p are available (just in terms of the waiting time for avisynth and topaz to load and such, it gets a little out of hand sometimes lol) youtube is usually the way to go and for music show performances, i go to kpopexciting or if the performance is pretty recent (as in within the past hour), i go on twitter and search up the date of the performance, the group’s name in hangul and .ts (for example “180429 트와이스 .ts) and there should be a couple of people who have already posted .ts files you can download (for twice content you can check out: zardexc and twiceneuproxima)
2. getting the clip
i’ll be focusing more on giffing performances from .ts files since the extra step of recording the clip is required.. but if your working with .mp4 files you can omit this step in its entirety!
open the video up on kmplayer and press “alt c” and this window should pop up:

and those are my usual recording settings! make sure to start recording a little bit before and after the scene you want (and i forewarn you, when recording especially high quality videos, the video will get a bit laggy but that’s because it’s capturing frame by frame but like the audio will continue to play perfectly fine.. you can always check out the result of what you recorded later to see if got the scene you wanted)
3. using avisynth
now that you have the clip you wanted from above, now it’s time to use avisynth! this is where i size my gif accordingly
with clips you got from above, i recommend using normalwebm (since the clips is already shortened anyway and for the timestamp, the starting time is fine)
if you’re not working with .ts files (i.e. you skipped step 2 completely) you can use normalwebmrange to capture the clip you want to use (like above, i recommend getting a second before and after the actual part you want to get as leverage!)
i follow the same process as the person i linked above once the clip has finished loading in avisynth.. for the settings, i always use 30 slow and debilinear!
4. using ps
now to actually using ps to make the gifs phew!
open up ps > file > import > video frames to layers

the final clip after it has ran through avisynth is usually in the temp folder for me and is almost always named “video” after selcting it, this window then pops up:

these are the default settings and i personally leave them as is
once it’s all loaded, this is where you can trim the clip! after trimming, in the right corner you’ll see a downwards triangle.. click on that and then click on “convert to video timeline”
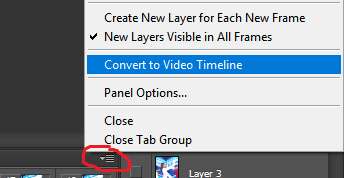
now you want to convert everything to a smart object so you can apply the sharpening! on the layers panel, select ALL the layers (select the first layer and once you scrolled up to the very last layer, press shift and then click on the last layer OR up at the top go to select > all layers) once they’re all selected, right click and choose “convert to smart object”
now you’re left with one layer in your layers panel! and now it’s time to sharpen
i use both topaz clean and topaz denoise to sharpen my gifs.. you have to play around with topaz clean a bit to find out what you like as it’s entirely based on preference! as for topaz denoise, i always choose “jpeg - light” and will usually play with the reduce blur option to adjust the sharpness
this is the gif without any topaz applied:

and after applying topaz (the difference is not too obvious but the lines now look smoother):
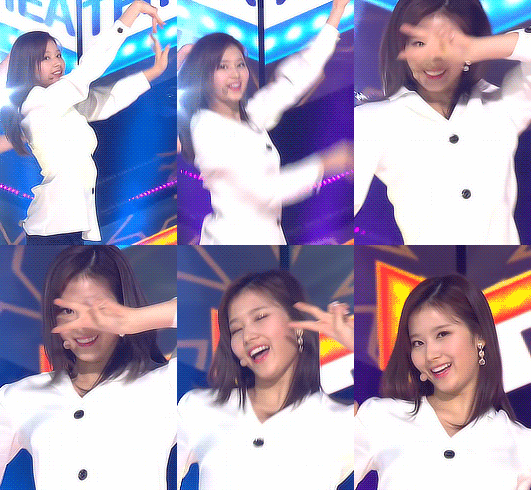
after you’ve sharpened to your liking, you’re single layer will include the smart filters you applied right below it.. next, right click on that layer and “convert to smart object” again until you’re left with another single layer with the smart filters no longer being present.. click on the downward triangle in your timeline again > convert frames > flatten frames to clips

this is where the real waiting begins!!! (and my most dreaded part of giffing) as it all depends on how many frames your gif has it may take a while.. so this is when you could take that much needed restroom break or get a snack or even open up the psds you plan to use so that once topaz finishes running :)
after ps + topaz has finished running, your layers panel now has all the edited frames! as a personal preference i select all those frames and group them into one so it’s easier for me to locate the psd once i add it in.. go back to the downwards triangle > convert frames > convert to frame animation.. now you should be left with only one frame in your timeline! what you want to do next is click on the downwards triangle again > make frames from layers
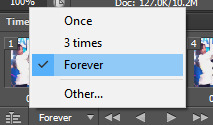
always delete the first frame and you should now have the same number of frames you had when you trimmed in the beginning in your timeline! this is now where i time the gif, select all the frames in your timeline, right click and select other.. this is all based on preference again but if your gif has a lot of frames (say 60+ i use a timing of 0.05) or if there is only a few frames (30 or less, 0.08 or i’d sometimes even go to 0.1) and don’t forget to change the timing to forever!
5. colouring and saving
you’ve made it this far and you’re now in the home stretch! the last thing to do before saving is to colour the gif to your liking~ you can check out yeahps for psds too^^ drag the psd into the workspace that has your new gif and make sure it is above your frames in the layers panel
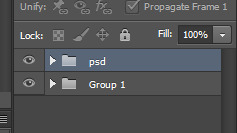
in the end i’ve come to rely on 1 of 3 base psds (depending on which one best suits the gif i’m making) and i just adjust it a bit to fit my preference.. for me i almost always go straight to editing colour balance, exposure and selective colour!!!
to save your gif: on your keyboard, press “alt ctrl shift s” in that order or you can go to file > save for web.. these are the settings i usually use to save my gifs! instead of pattern, i sometimes use diffusion as well :)
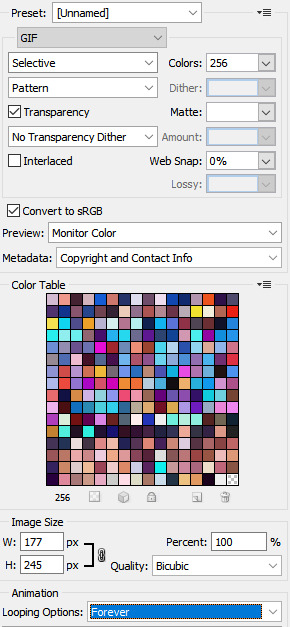
and this is the final product ready for tumblr!

#.txt#phew and now it's done!#if ever just come to me if you have questions and i can help you through it#gif tutorial#ps help
42 notes
·
View notes